![]()
![]()
![]()
![]()
![]()
![]()
![]()
![]()
![]()
![]()
![]()
![]()
![]()
![]()
![]()
![]()
![]()
![]()
![]()
![]()
![]()
Chassis & Steering
Featured
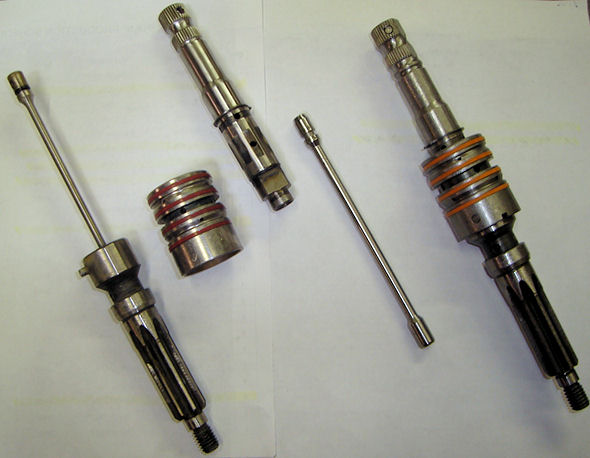
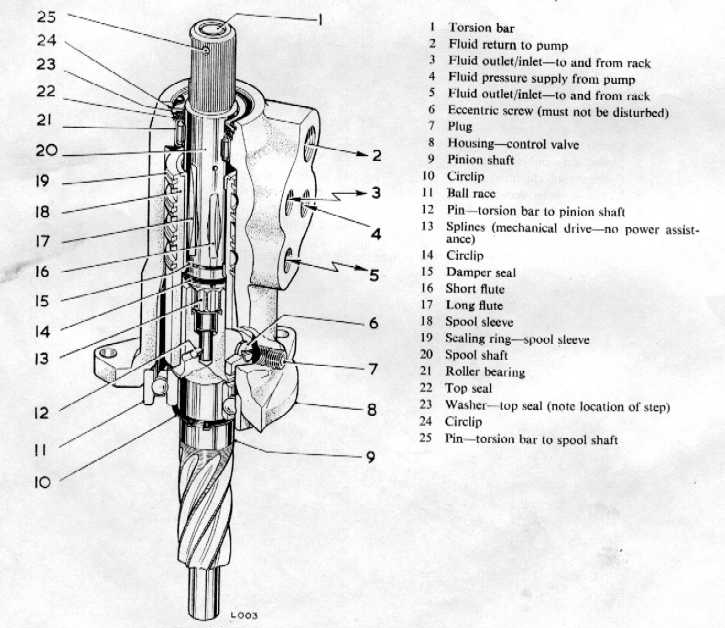
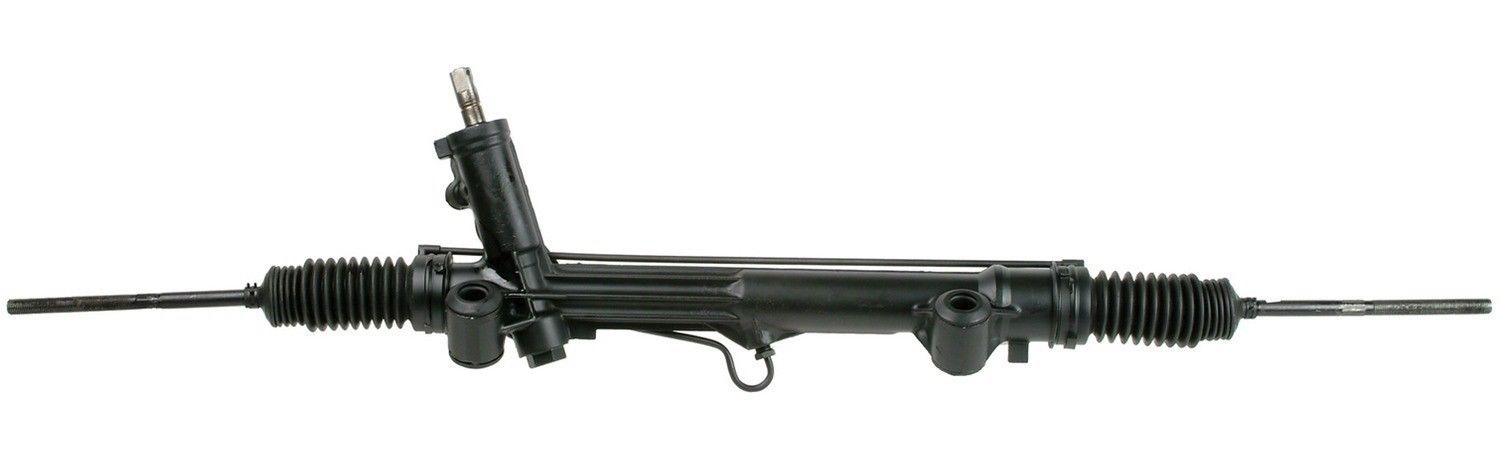
The Terminator steering rack has generally been considered an upgrade from previous Mustangs. While they all tend to carry the same 15:1 ratio (with 2.5 turns lock-to-lock), the Terminator benefits from an increase in thickness of what is known as the torsion bar, or "T-bar", which gives the rack its firmer feel. The torsion bar is actually a part of the spool valve assembly which composes the pinion, as in "Rack-and-Pinion". In addition, the SN-95 Mustangs use the higher-flowing Motorcraft C-III pump for better assist. It is also a "Hydro-Boost" system, where the power steering pump provides fluid pressure to operate both the brake booster and steering gear. For more on the Mustang racks, check out Steered Straight - a worthwhile read with some good information.
 Back
to the T-bar, it fits inside the spool valve and is connected to the steering
shaft at one end, and the pinion gear at the other. In essence, it acts as a
spring, and the twist of the T-bar is what controls the flow of fluid through
the valve assembly. The thicker the T-bar, the "harder" it is to turn the wheel,
giving the rack more of a "firm" feel. In the case of the Terminator (and Mach
1), the T-bar has a thickness of a 0.230". If you wanted an even firmer feel,
the next step up would be to a 2000 Cobra R rack, which has a slightly thicker
0.245" T-bar.
Back
to the T-bar, it fits inside the spool valve and is connected to the steering
shaft at one end, and the pinion gear at the other. In essence, it acts as a
spring, and the twist of the T-bar is what controls the flow of fluid through
the valve assembly. The thicker the T-bar, the "harder" it is to turn the wheel,
giving the rack more of a "firm" feel. In the case of the Terminator (and Mach
1), the T-bar has a thickness of a 0.230". If you wanted an even firmer feel,
the next step up would be to a 2000 Cobra R rack, which has a slightly thicker
0.245" T-bar.
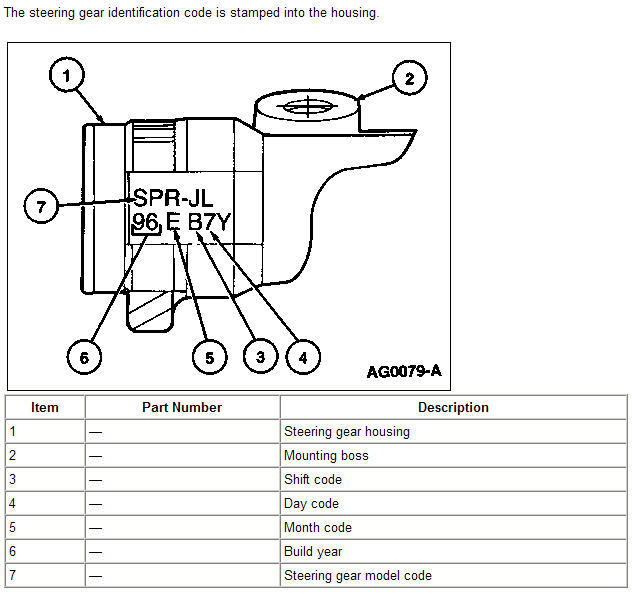
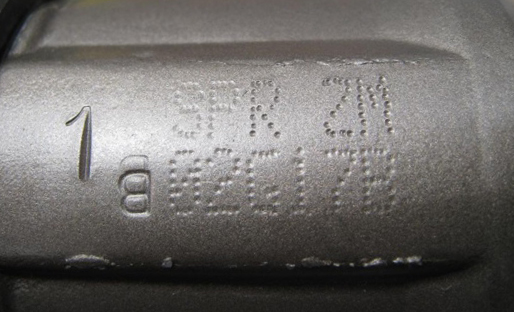
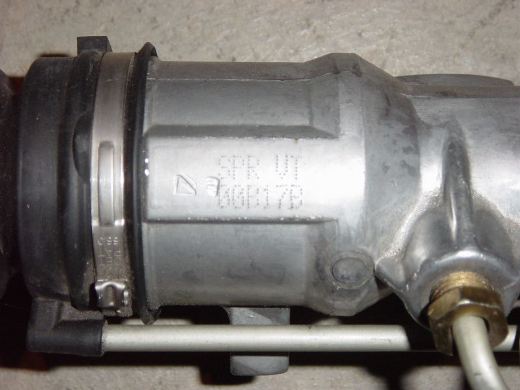
Along those same lines, replacing a factory rack, or upgrading one on an earlier model seems to present somewhat of a challenge. The most obvious way to tell an original Terminator rack from any other is the model code stamped in to the end of the housing on the passenger side. For the Terminator, this code is SPR-ZM. If you are fortunate to find a rack from the Cobra R, it would show SPR-VT. Unfortunately, the housing itself has been used in more than one application, having the same engineering number, so it isn't the best indicator of which rack you have (unless, of course, it is still the original).
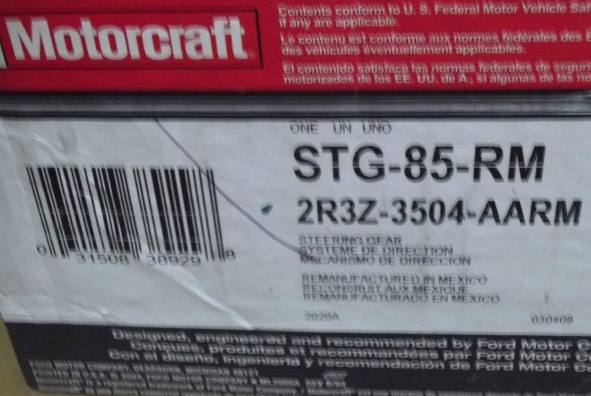
If you source a remanufactured unit from the aftermarket, it could be anyone's guess what you'll get inside, but there are options. The last Ford part number is 2R3Z-3504-AARM (Motorcraft STG-85-RM) - always good to get an OEM part, but definitely scarce. If you believe what is posted on various forums, I have heard of guys having success with a version from Cardone that carries their part number 22-2000 (and they always seem to be painted black for some reason!). Finally, a company galled AGR produces new units in both SN-95 (Terminator-spec) and Cobra R versions. Pricey, but they may be the best ones out there. In the end, do your research and don't get steered in the wrong direction!
Note: Steering ratio, in simplest terms, is the distance the rack moves for one turn of the pinion. One complete 360° rotation of the pinion by the steering wheel results in a corresponding movement in linear degrees of the wheels. A 15:1 rack, for example, would refer to the simplified ratio of 360° of pinion rotation resulting in 24° of wheel movement, or 360:24, which can be then expressed as 15:1. Easy enough!
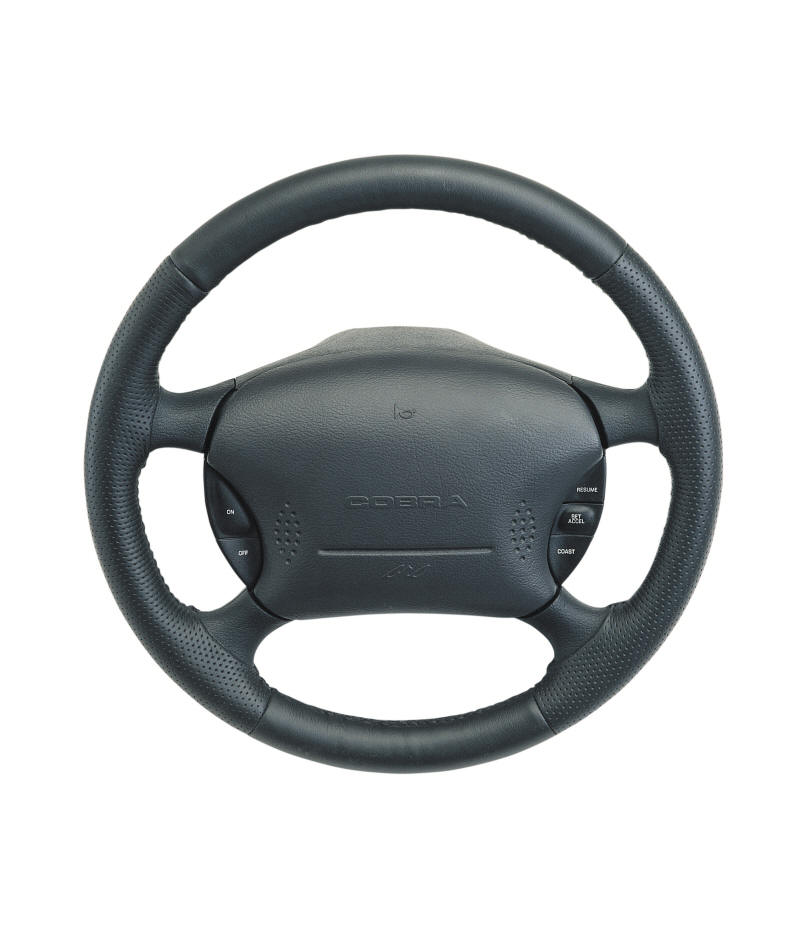
This is another upgrade that many people overlook. If you've ever driven a performance car with a nice, thick wheel, you'll know exactly what I mean. They really make it much easier to hang on to for long (or spirited) drives, and are more comfortable, which eases up a bit on fatigue. While the original Terminator wheel is still an upgrade from the one in the base Mustang, there is still room for improvement.
My first (well, second) wheel, was the FR-500 version from Ford Racing. They were originally listed as M-3601-B, but unfortunately became obsolete somewhere around 2010. When they were on the market, the price was right around $150 - an incredible deal - but expect to pay two or three times that (or more) if you happen to locate one now. The improvement of the wheel is also the larger diameter, which is also softer than what Ford gives us from the factory. Additionally, the leather along the sides is perforated, so it helps to wick away any sweat if you are really cranking on it.
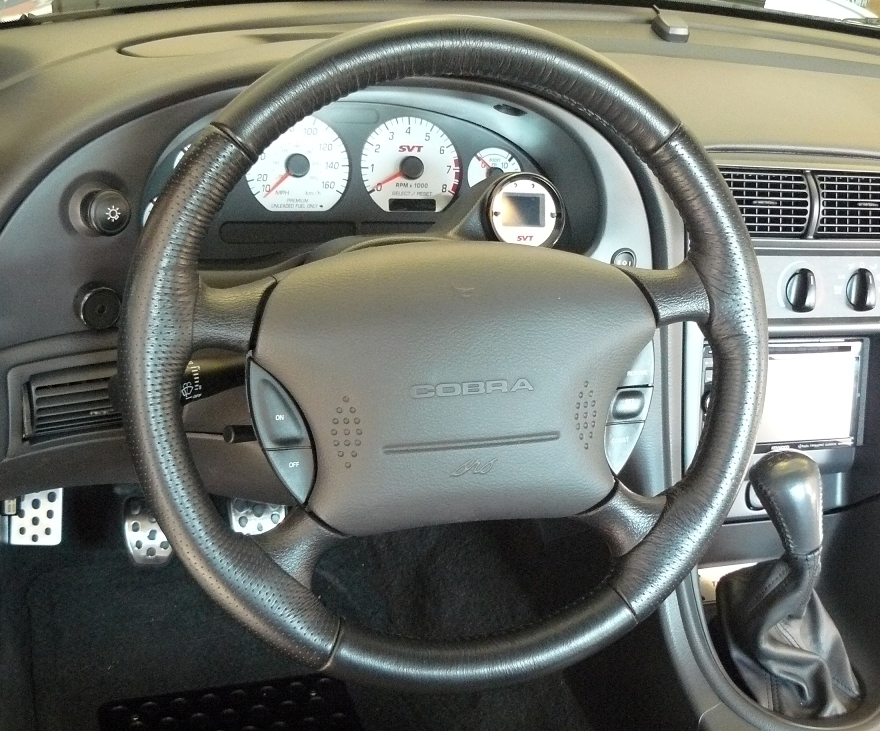
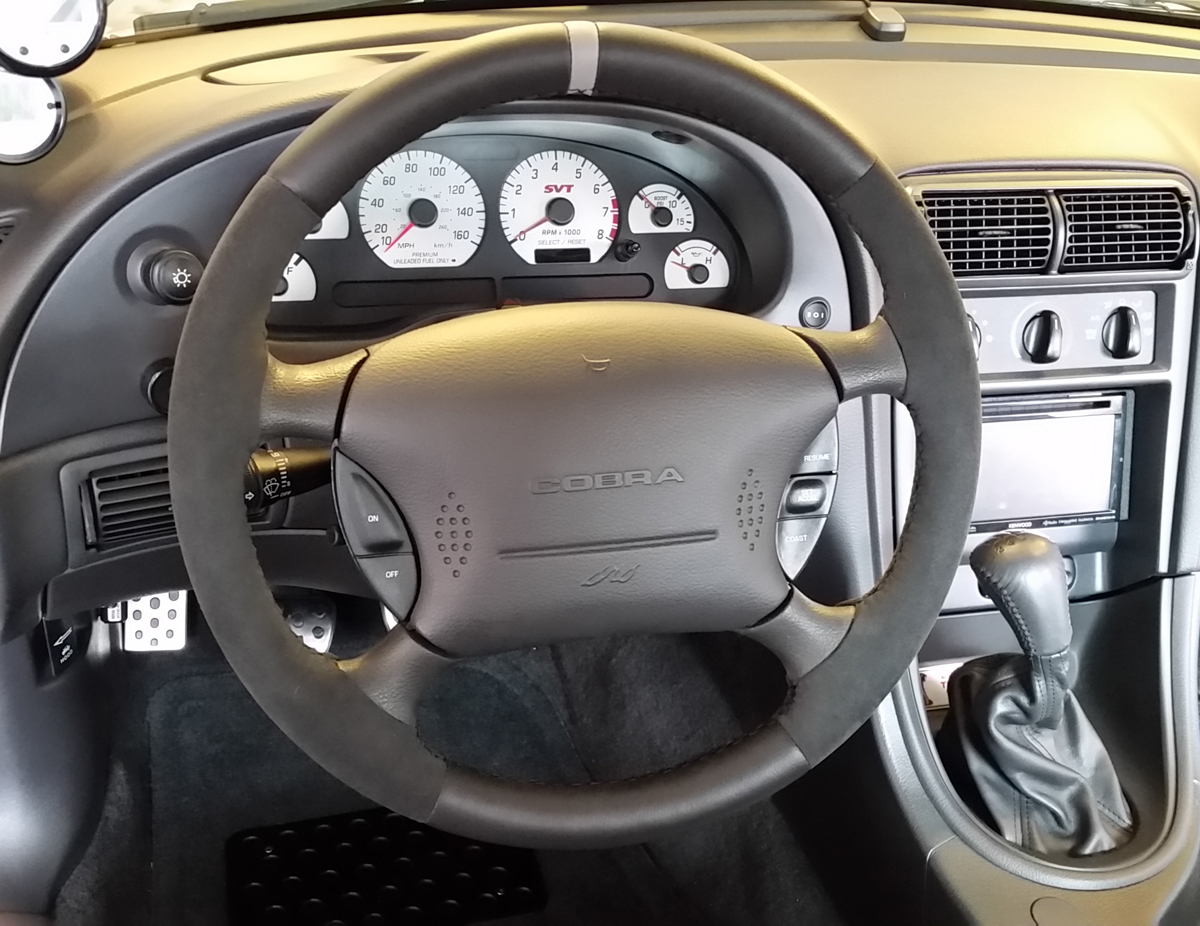
Although I really liked the feel of the FR-500 wheel, one thing that drove me a bit nuts was the black color. It still looks great, but it's not an exact match to the Dark Charcoal interior. It's probably something that most people wouldn't notice, but it did always nag at me. The pictures below show the wheel ready to mount (sporting the protective wrap), and the other is how it looked in the car. The contrast in color is definitely evident, but again, it's still nice and well worth having.
Note: If you are a fan of the original FR-500 wheel, good news: they are being reproduced through Latemodel Restoration. The wheel carries their part number LRS-3603FR500G, and is economically priced. Even better, it comes in Dark Charcoal as well as black. If you liked the original, you'll probably like the new one even better, especially since it will match perfectly!

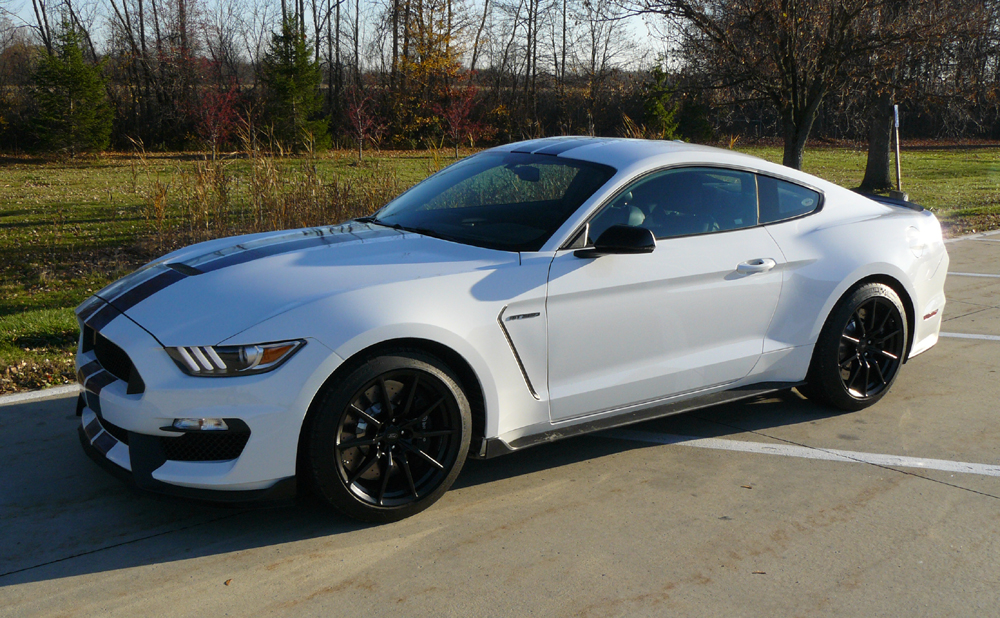
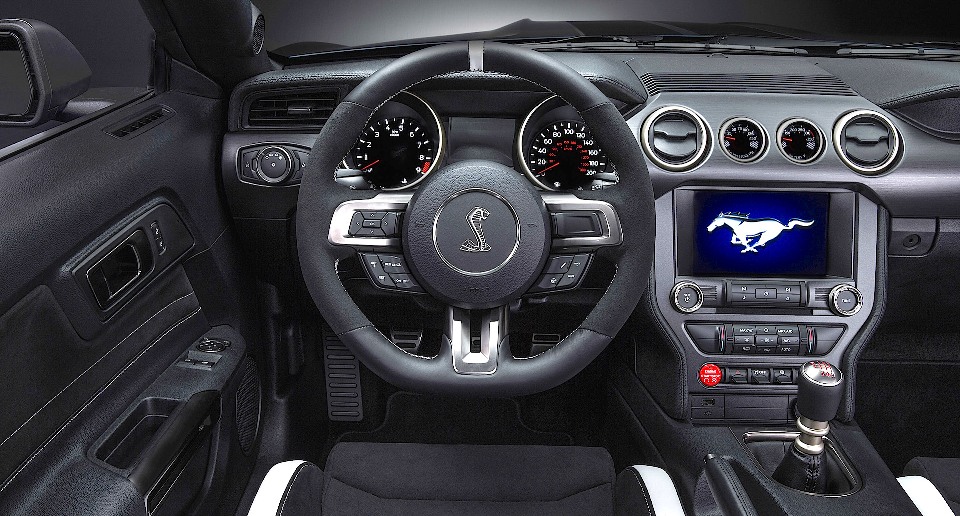
After getting the chance to spend an afternoon in the fall of 2015 with a pre-production 2016 Shelby GT350, I was immediately enamored by many of its features, one also being the fantastic steering wheel (if you've never driven a performance car with an improved steering wheel, you don't know what you are missing!). Not only was it nice and thick, it was covered in grippy Alcantara on the sides, rather than leather. The car was an absolute blast to drive, and whipping it around the curves was even more enjoyable with such a solid hold on the wheel. This got some other wheels turning...
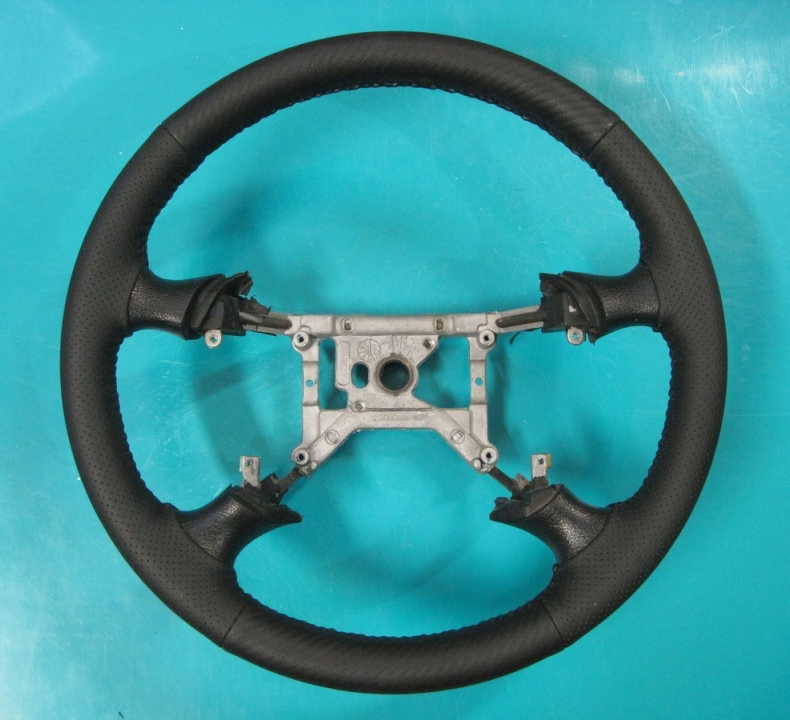
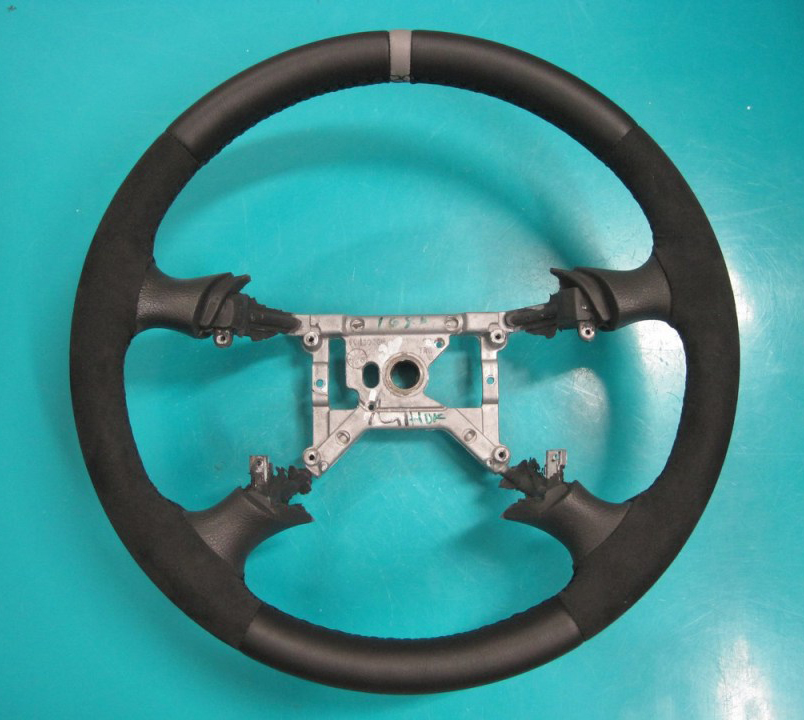
Fast forward a few months, and I decided to have my original wheel worked over and upgraded, especially if it could be done to match the interior again. I knew when it came time to having a custom wheel made, there was one place to go that has always been given fantastic reviews: Dallas Custom Steering Wheel. While there are other craftsman out there that do real nice work in this area, I was really impressed with a sample picture they sent me of a custom replica FR-500 steering wheel. If they could fatten up an original wheel and make it to a customers liking, I had to give it a shot. To say it turned out amazing is an understatement.
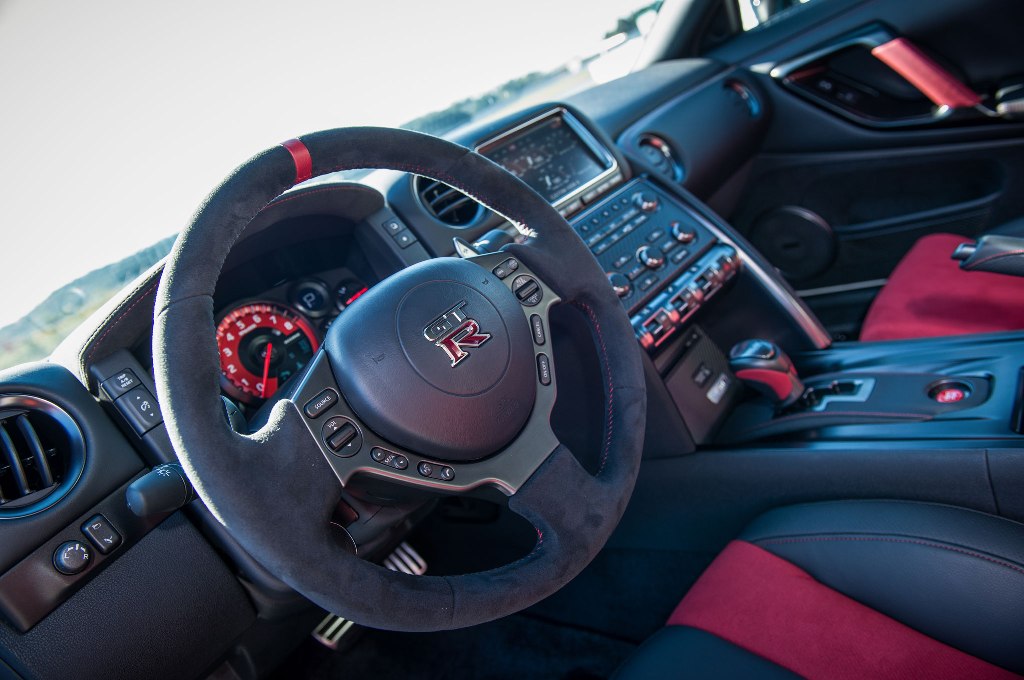
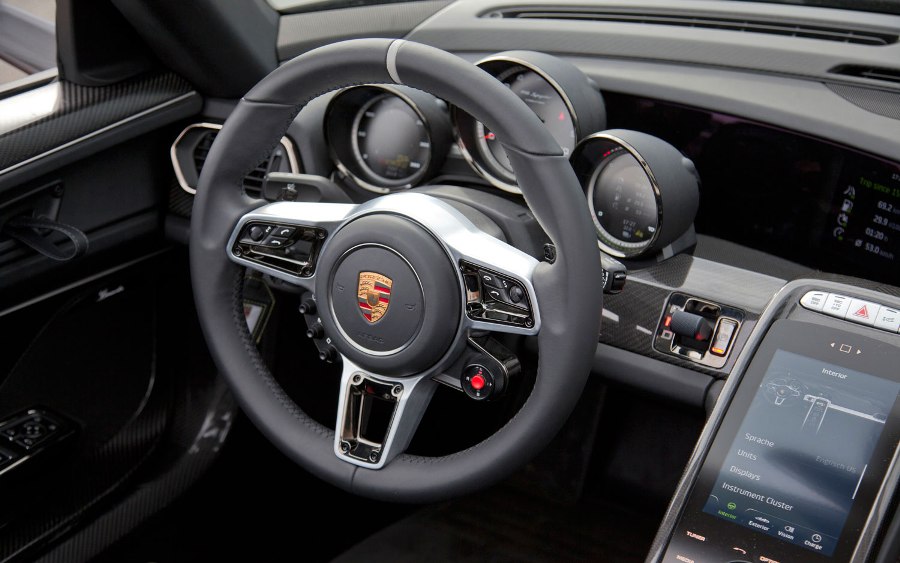
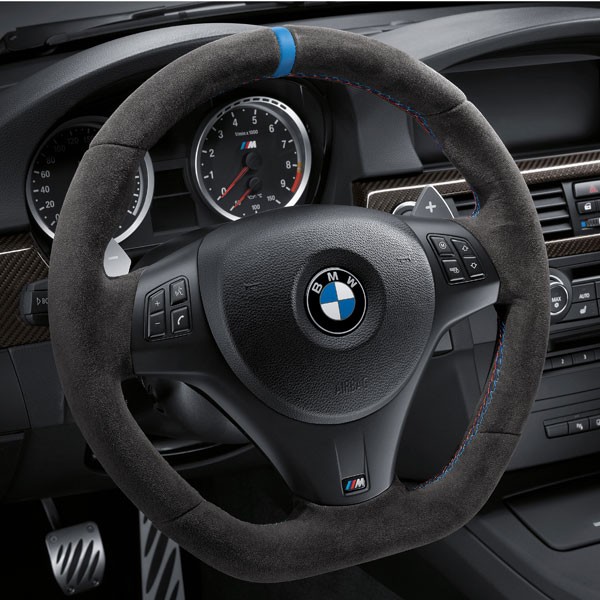
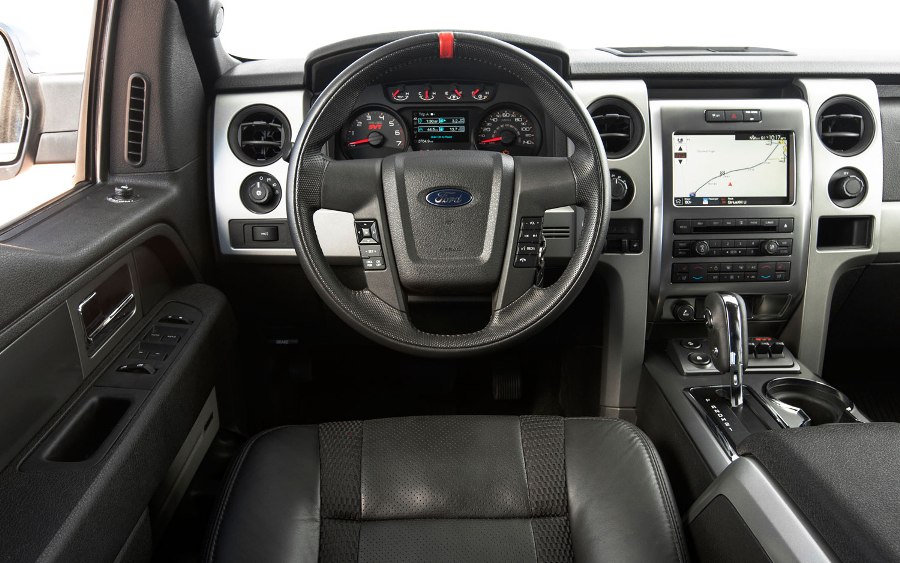
The picture below left was one sent to me by the shops owner, Donald, right after it was done, and I was definitely pleased with what I saw. I had requested the Dark Charcoal leather on the top and bottom sections, and also went with the matching Alcantara on the sides. Even better, the circumference of the wheel comes in at just over 4" - right in the ballpark of the original FR-500. While they were at it, I had them add a 1/2" "alignment stripe" up top that matches the Medium Graphite seat inserts - another nice touch. This is something that comes in real handy for any aggressive driving or track time, and is a feature you'll see on many modern sports cars like the Nissan GT-R, Porsche Spyder, or as an upgrade to the BMW M-Series. Of course it is also included on the new Shelby (both the GT350 & GT350R), and Ford even saw fit to have it on the F-150 Raptor - perfect considering its intended use.
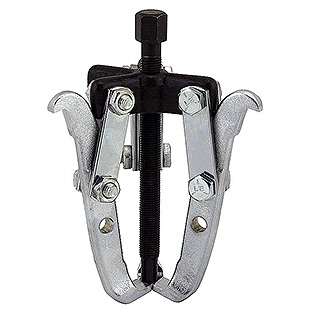
A steering wheel swap in an SN-95 Mustang is also incredibly easy, by the way. I have done this several times and found the most effective tool to be a 3-jaw gear puller, not a true "steering wheel puller". Once you remove the air bag and the center mounting bolt, the gear puller will be able to grab the steering wheel frame in a few spots and with just a slight amount of pressure, the wheel will pop right off (be sure to protect the threads for the mounting bolt as well). It's a bit unorthodox, but really the easiest way to accomplish this. There's even a write-up at American Muscle showing the process.
While I was sad to see the rare FR-500 wheel go, I couldn't be happier with the new one. The grip is fantastic, and I can relax a bit now that all is harmonious with the interior trim. Since a new Ford steering wheel is not an option for these cars any longer, you can't beat having one that can be re-conditioned, especially when you can add your own personal touch. Even if you just want your OEM wheel looking like it did when your Terminator rolled off the assembly line, give Donald a shout - you'll be glad you did. He'll work his magic, and your hands and interior will be better off!
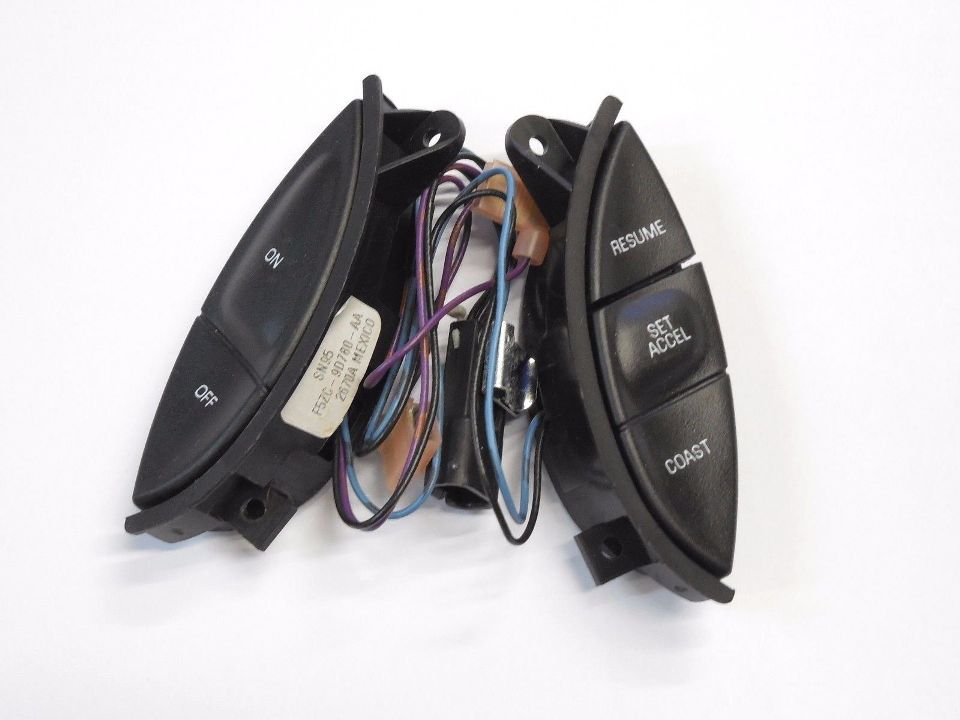
Note: With the removal and installation of the wheel being a cinch, one minor annoyance is the cruise control switch assembly. Not that it is hard to separate either, but it's fairly fragile which means the mounting tabs (especially the lower ones) often break off. It can be re-used without a problem since it sits fairly snug anyway, but if you want to replace the part (especially if you use yours a lot and the text has rubbed off), it is still available from Ford. These were all the same from '94-'04, and fall under the part number F5ZZ-9C888-AB. The easiest way to acquire them is just to search for the Motorcraft SW-5912, which usually runs right around $50.
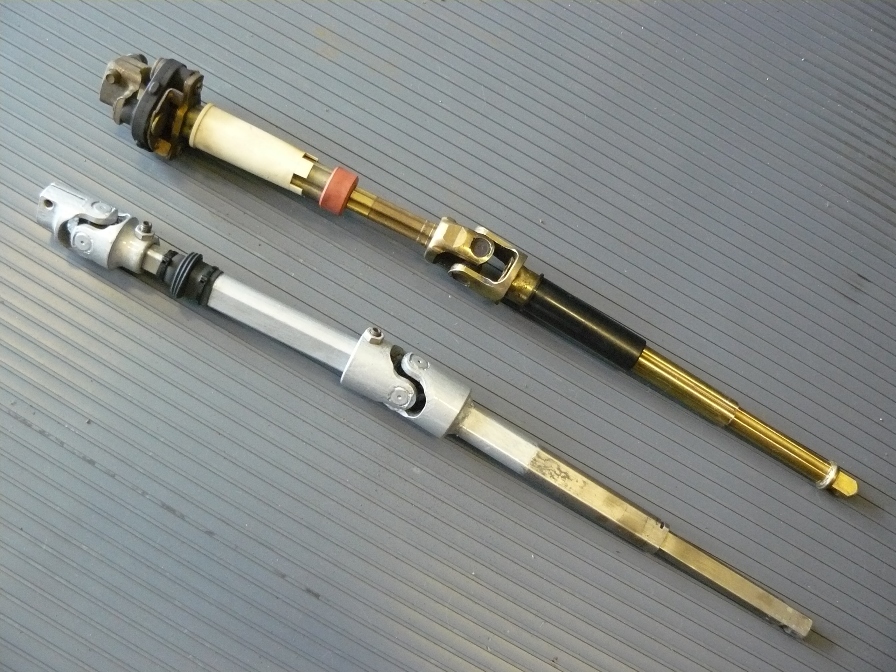
Along with the grippy steering wheel, another upgrade to increase the steering feel comes from a solid shaft with Borgeson universal-joints. The factory piece isn't actually all that bad, but it is prone to some imprecise steering thanks to the slip-fit stamped steel and a rubber rag-joint, so it had to go. I did actually look at a version by Maximum Motorsports (MMST-14), but happened to find a lightly used one by Flaming River at a greatly reduced price, so I didn't hesitate to snag it.
These upgraded shafts use steel u-joints and completely remove any "vague" feeling that is present with the factory part. One difference that is worth mentioning when it comes to the FR unit is the attachment of the joints: they are pinned with set screws, whereas the MM version has them welded. It hasn't been an issue since I added a decent amount of high-strength thread-locker, and so far, they haven't budged.
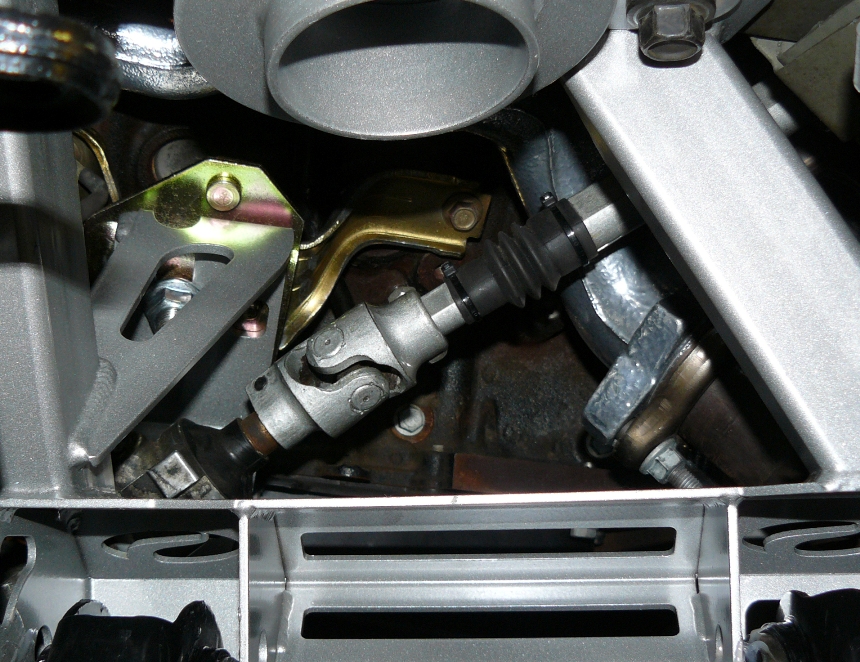
When mine arrived, it had a coat of rust on it (as I expected), which is due to them being made of bare steel - sort of a down side. Not a problem though: a nice clean-up and a coat of POR-15 silver epoxy paint turned it as-new for the transplant. The pictures below show the "new" one next to the original, as well as a view of it behind my new K-member, which is featured in the next section.
A solid steering shaft really makes an impact when it comes to not only the road feel, but the "crispness" of any turns. In addition, the removal of the chunky rag-joint frees up a bit more space near the engine which is probably also advantageous to those who run long-tube headers. Installation is a snap, and for a walk-through of the process, see the instructions over at MM's web site. Also, the spec sheet from Flaming River is nice to have if you happen to own this specific part.
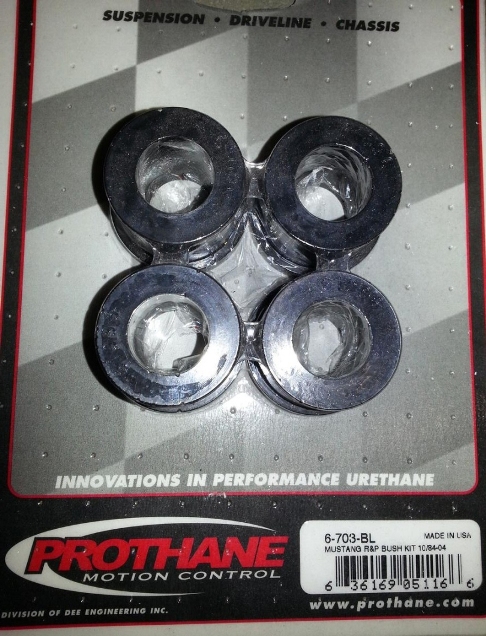
Note: While here, I decided to pull the original rubber bushings out of the steering rack and replace them with the Prothane version, part number 6-703-BL (which also are a direct fit with the new K-member as well). Not surprisingly, they are quite rigid and also helped contribute to the solid steering feel. If you still have the factory rubber bushings in place, the upgrade to poly is definitely worthwhile. Adding to that, these racks were prone to "creak" thanks in part to the give of the OEM rubber (addressed in TSB 05-14-03), but a bushing upgrade will take care of that.
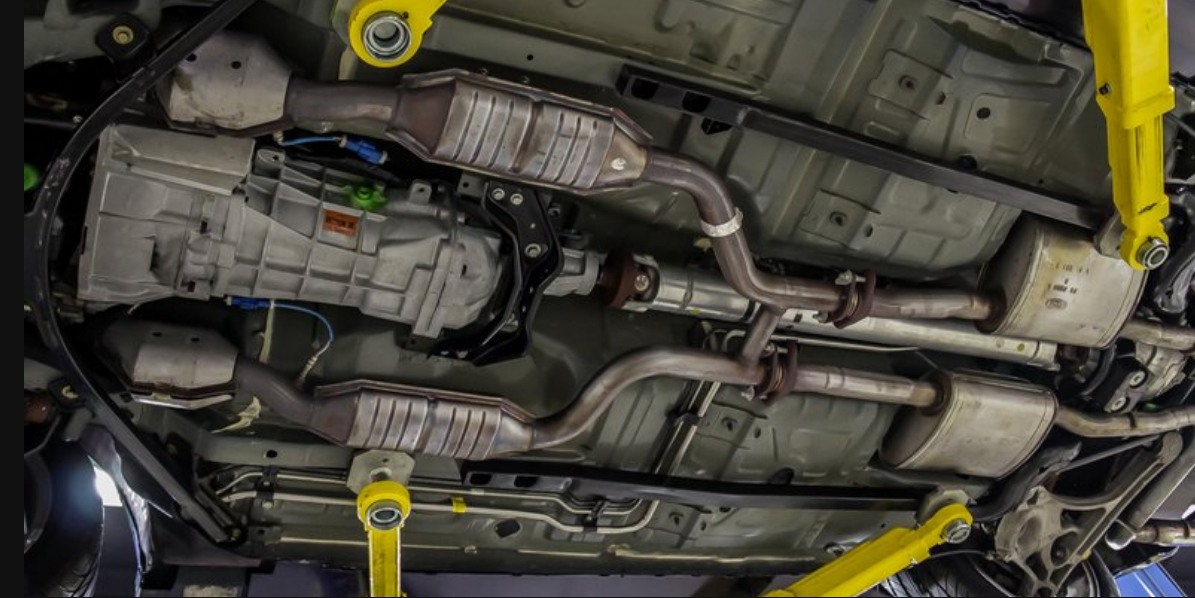
I really wasn't planning to upgrade my K-member, but since I needed to drop it for an exhaust manifold swap, the wheels started turning (see my Exhaust page for those details). Curiosity got the best of me, and since I've never hesitated to solicit Maximum Motorsports, I checked out their gear again. Unfortunately, most tubular units - including theirs - require aftermarket control arms and coil-over conversions which didn't interest me in the slightest, especially due to the increased cost. Many of them also just look downright flimsy as well (not MM's, however), so I knew I wanted something that was not only strong, but would accept the factory springs and control arms.
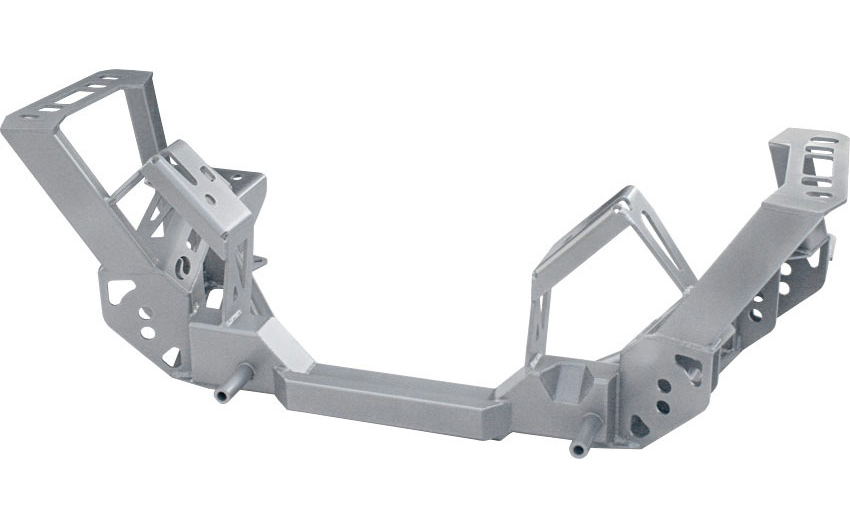
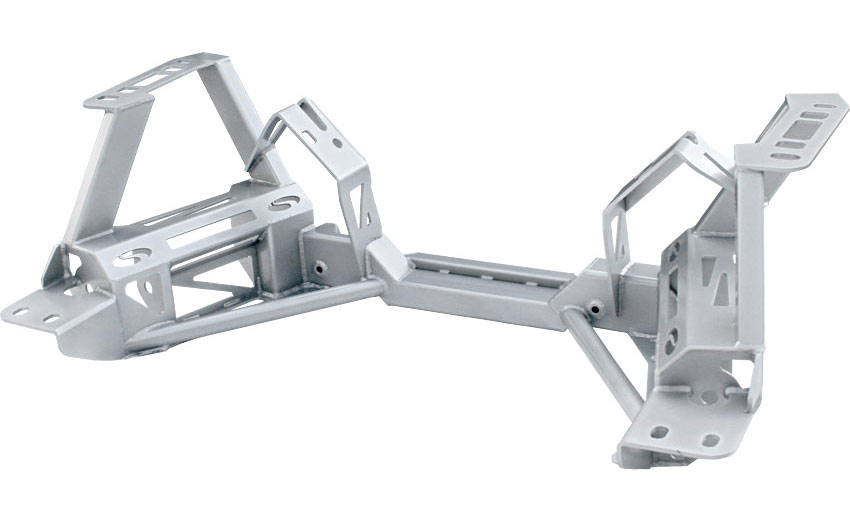
After doing some research, I decided the ideal replacement was the Steeda 555-5078 (which sadly went out of production several years later). The timing worked out great since I had a list of projects to tackle early in 2014 and this was easily added. When I ordered it, they happened to be running a holiday special (around Christmas of 2013) that knocked a big chunk off the price, so I couldn't resist. Not only does it look great, it is built like a tank and weighs in at just 31 pounds - 19 less than the factory piece. It also accepts the factory springs by way of optional perches (not shown in the pictures below) and does NOT require aftermarket control arms OR an oil filter relocation kit. As a bonus, it is powder coated silver - a perfect match to my Cobra.
Along with the benefits of shedding some weight and being ridiculously strong, Steeda added two features that are actually common for aftermarket K-members, but still advantageous. The first is the ability to mount the control arms in one of two positions based on spring length, or ride height. This is important since lowering any vehicle also lowers the roll center, and unless you compensate for the change, your handling will suffer (more there on my Suspension page). Second, you have the option of moving the steering rack rearward to fine-tune the Ackermann geometry - a plus for twisty roads.
Note: Ackermann steering, in simplest terms, is the concept of the front wheels turning at slightly different angles in order to keep the turning radius constant. Since the inside tire will rotate slower than the outside, it needs to turn in at a sharper angle to compensate. An increase in Ackermann will increase the toe-out of the inside wheel which will improve turn-in. Also, shifting the rack rearward increases Ackermann slightly, but I actually left mine in the factory location - explained a bit further down on this page.
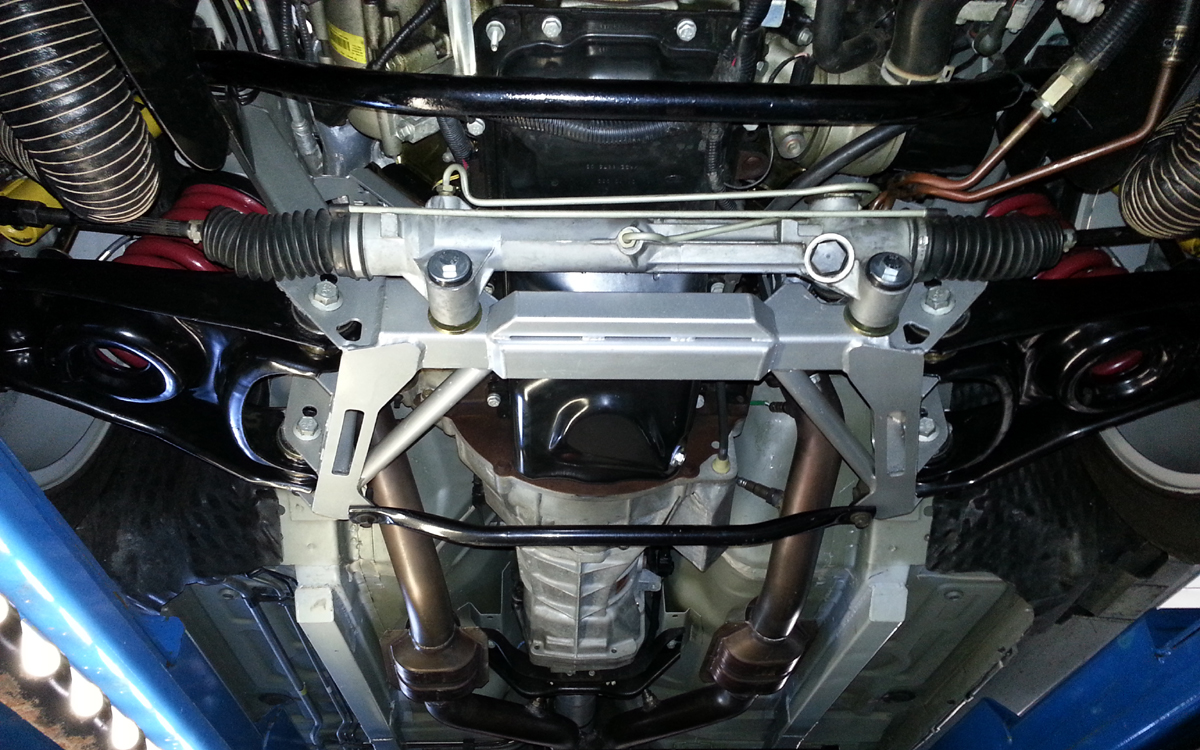
The picture below left shows the front end all buttoned up from a few years back, including the freshly coated control arms with their new bushings and ball joints. The other view is through the passenger side wheel well, showing the spring perch (the driver's side picture is in the previous section). It's evident there is a huge increase in space beneath and around the engine that will be perfect for any maintenance - a definite plus. It is worth mentioning that if you are a convertible owner and want to keep its OEM four-point K-brace, you are out of luck - there is just no way it will fit. I assume that is actually the case with all aftermarket K-members, but with a coupe it is not an issue.
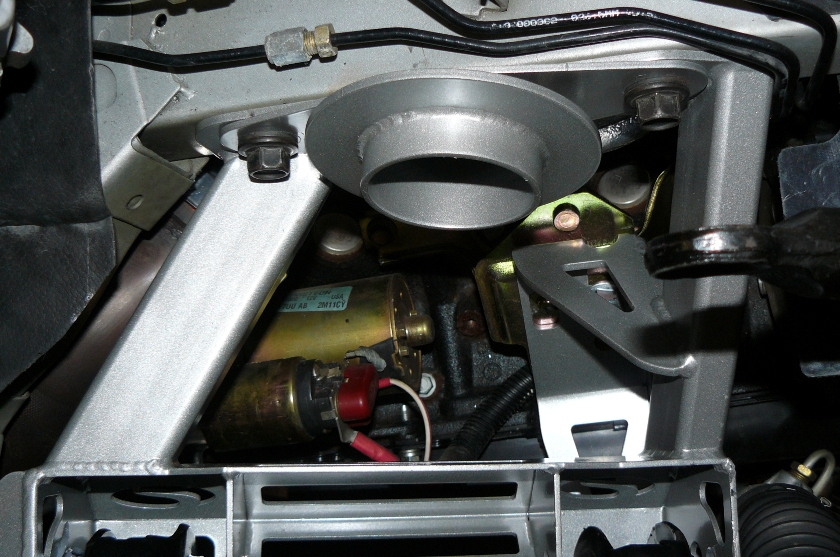
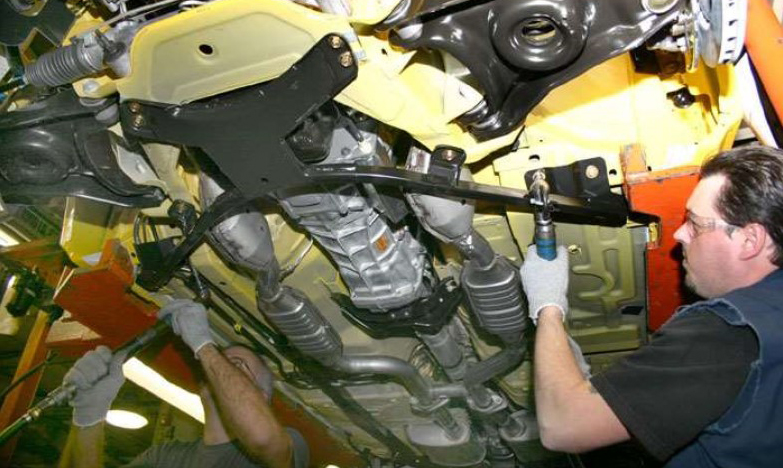
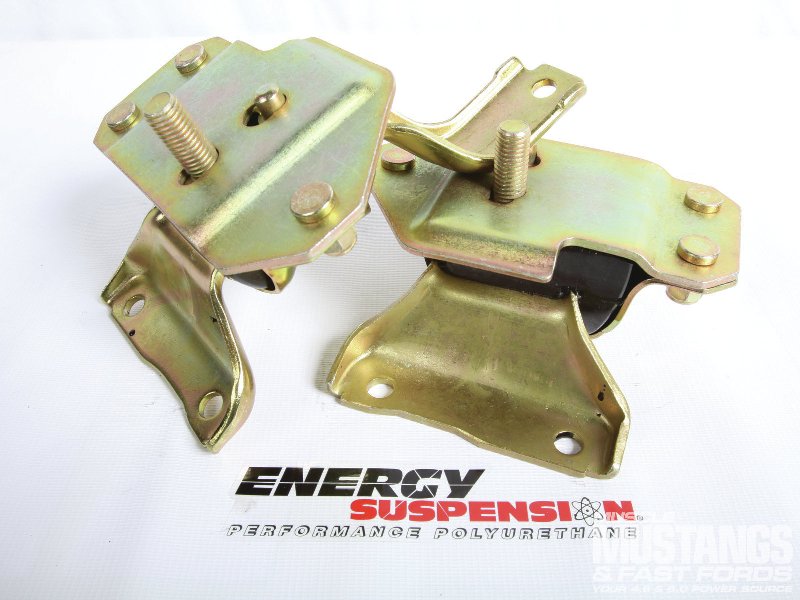
As I immersed myself in this project, I realized it was a perfect time to upgrade the engine mounts. Although my factory mounts were still in great shape at the 20,000 mile point, I went with the Energy Suspension 4.1127G polyurethane set anyway. This actually brings me to the only snag I encountered: it involved the heat-sinks that are used on the factory engine mounts. Their extra thickness prevented the engine from dropping completely in to the slots, most likely due to a bit more robustness of the ES parts. I really didn't want to remove the shields, but doing so allowed the engine mounts to seat themselves properly.
Note: While the new motor mounts come in firmer than stock, they aren't overly stiff like the other polyurethane version by Prothane, or even more so - solid mounts (a horrible idea for a street car). As with so many other areas, I wasn't about to accept a ridiculous amount of NVH, and Energy Suspension came through. The new mounts fit great (well, without the heat sinks), and I have no doubt they'll be here for the long-haul.
Overall, installation of a new K-member isn't difficult, but it's a tedious process that involves removing the front suspension and supporting the engine from above (thank you Harbor Freight tools). Steeda really did a great job with this since the fit was absolutely perfect, and it was aligned within factory tolerances on the first try. I decided to be overly precise, so once the distances between the chassis pick-up points were measured, one very small shift and those numbers were exactly matched. It's probably worth mentioning that the Steeda instructions were basic and to the point, but MM has a comprehensive write-up on the whole process as an FYI.
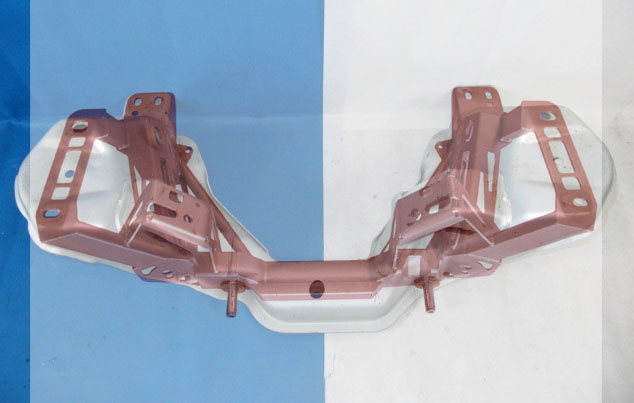 While an aftermarket K-member is primarily
designed to save weight, it also still needs to be strong since it is an
integral part of the front frame. Nothing is going to beat the factory stamping
there, but I wasn't willing to accept something that was merely lightweight - and would probably
fold like a cheap suit in the unlikely event of any front-end impact. Many
aftermarket manufacturers claim theirs have never "failed"
in the field, but it still wasn't comforting enough to add just any one I came
across simply because it was lighter and less expensive. The bottom line: you
get what you pay for.
While an aftermarket K-member is primarily
designed to save weight, it also still needs to be strong since it is an
integral part of the front frame. Nothing is going to beat the factory stamping
there, but I wasn't willing to accept something that was merely lightweight - and would probably
fold like a cheap suit in the unlikely event of any front-end impact. Many
aftermarket manufacturers claim theirs have never "failed"
in the field, but it still wasn't comforting enough to add just any one I came
across simply because it was lighter and less expensive. The bottom line: you
get what you pay for.
Even with less bulk than the Ford part, there is no doubt Steeda had a quality product here (for an interesting comparison of the two, see the overlay image in the thumbnail above). It definitely is a great bang for the buck, especially since a complete package from Maximum Motorsports with all the peripheral parts is almost twice the price of this one. I really couldn't be happier now - this has contributed to almost a 40 pound loss of weight from the front end - one of many changes that has sharpened the handling even more.
 In
late 2015, I decided to tinker with the K-member slightly and explore the
possibility of upgrading from the original Ford 2-point brace (shown in the previous
section). There is also a matching "G-Trac" brace
right from Steeda that was a direct fit, but I
neglected to acquire it when I purchased their K-member. No worries - the factory part fit
fine temporarily, but what I really wanted to do was find out if there was an
even better option: a four-point brace.
In
late 2015, I decided to tinker with the K-member slightly and explore the
possibility of upgrading from the original Ford 2-point brace (shown in the previous
section). There is also a matching "G-Trac" brace
right from Steeda that was a direct fit, but I
neglected to acquire it when I purchased their K-member. No worries - the factory part fit
fine temporarily, but what I really wanted to do was find out if there was an
even better option: a four-point brace.
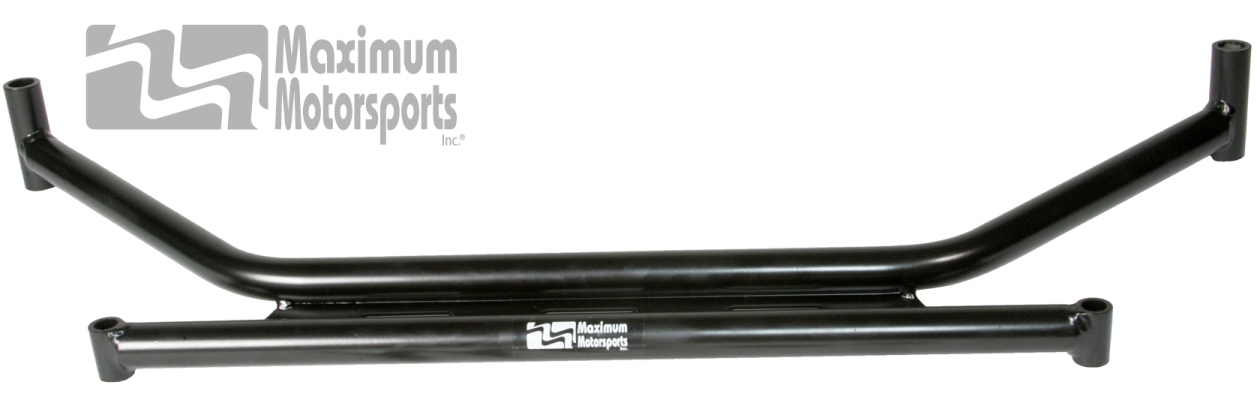
When I made the K-member overlay image (thumbnail in the previous section), it appeared that the bolt holes for the brace matched between the factory K and the Steeda version. Considering the overall fit was perfect, this seemed logical. Unfortunately, I had no real way of knowing which "upgraded" brace would actually work here until I purchased one. As it turns out, the Maximum Motorsports four-point brace, MMKB4-4, fit. What a stroke of luck!
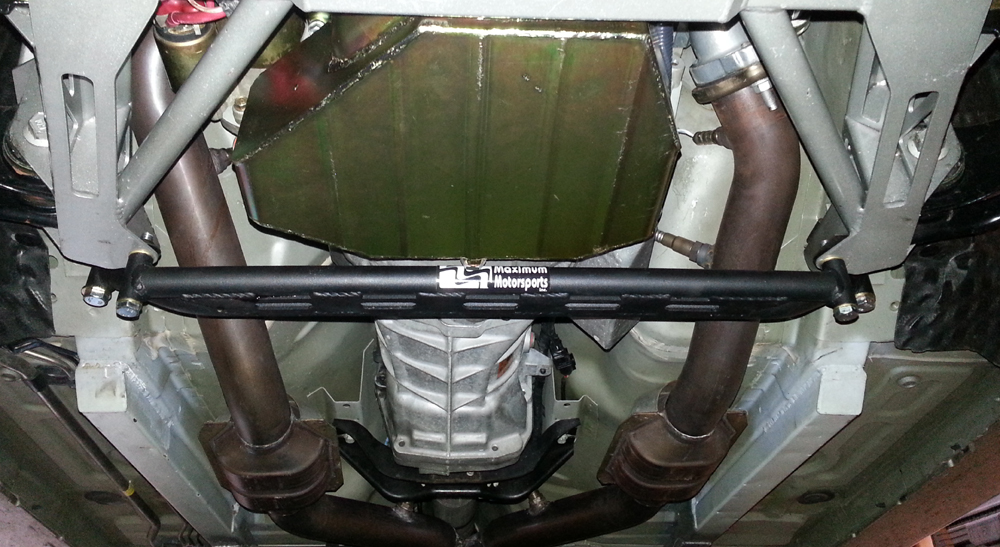
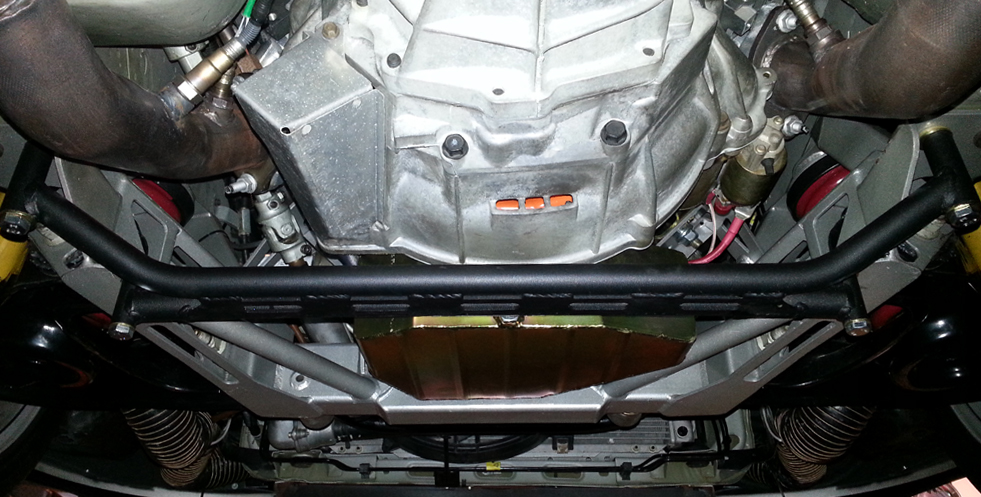
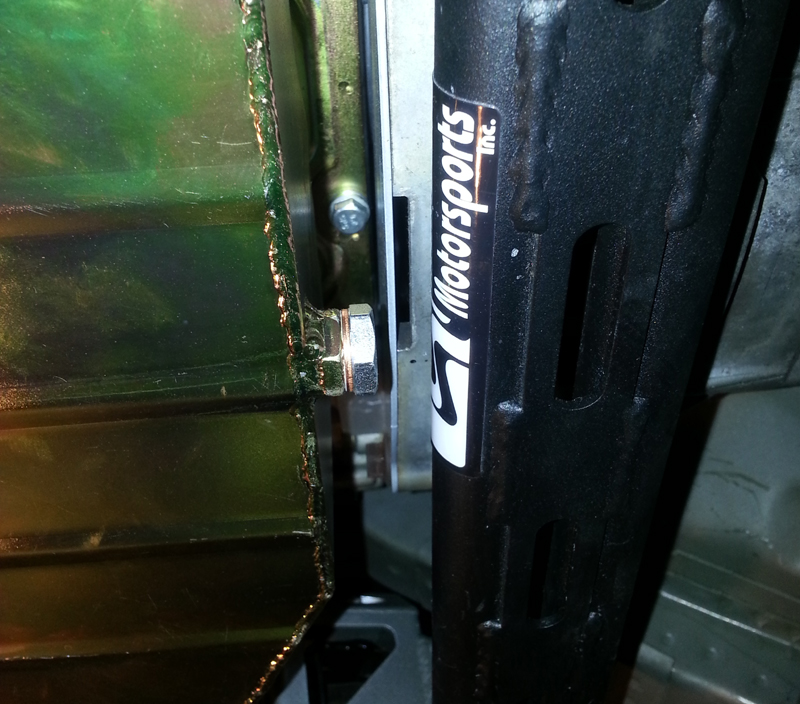
Like every part from MM, this brace is another one that doesn't disappoint: it is of the highest quality, and its strength is apparent. Additionally, its weight is only marginally heavier than the OEM part - another bonus. The pictures above, along with the thumbnail, show not only its design, but how it looks once installed - this time under my new Aluminator engine. From the rear, the additional support is easy to see, which is purposed to send part of the load to the uni-body at the rearward k-member-to-chassis mounting points. Nice.
Does this brace work, and is it worth it? I'd say yes to that for sure. Although I'll admit that the new K-member has made an enormous improvement in handling, there is no doubt that any additional bracing in the SN-95 chassis is always advantageous (providing a ridiculous amount of weight isn't added). While coupe owners aren't generally saddled with some of the shakes and rattles of the convertible, we also didn't get a beefy K-member brace, so this one is just what the doctor ordered. While I wouldn't yank the OEM brace if I owned a 'vert, for those that have swapped out K-members anyway, it's a necessity to put more reinforcement back in this area and this would be a great option.
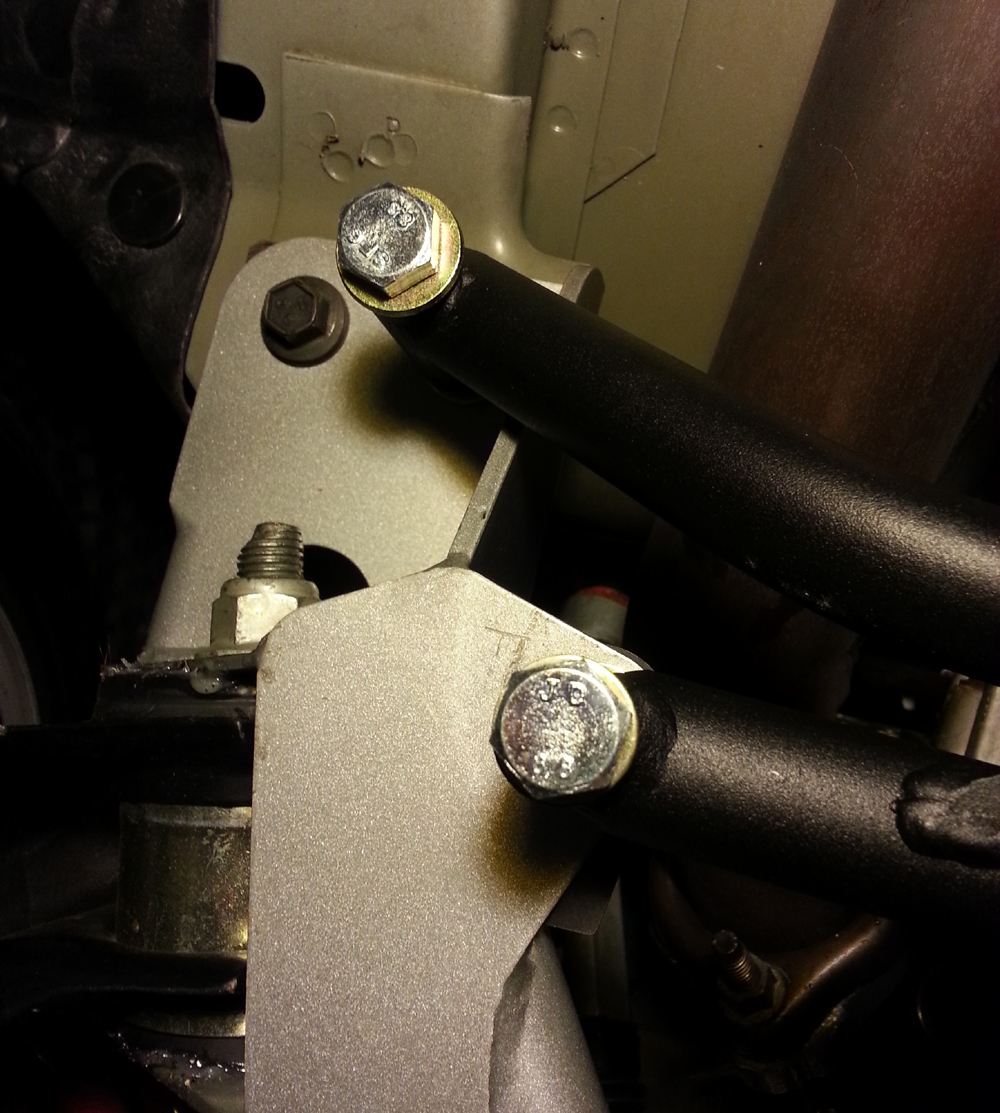
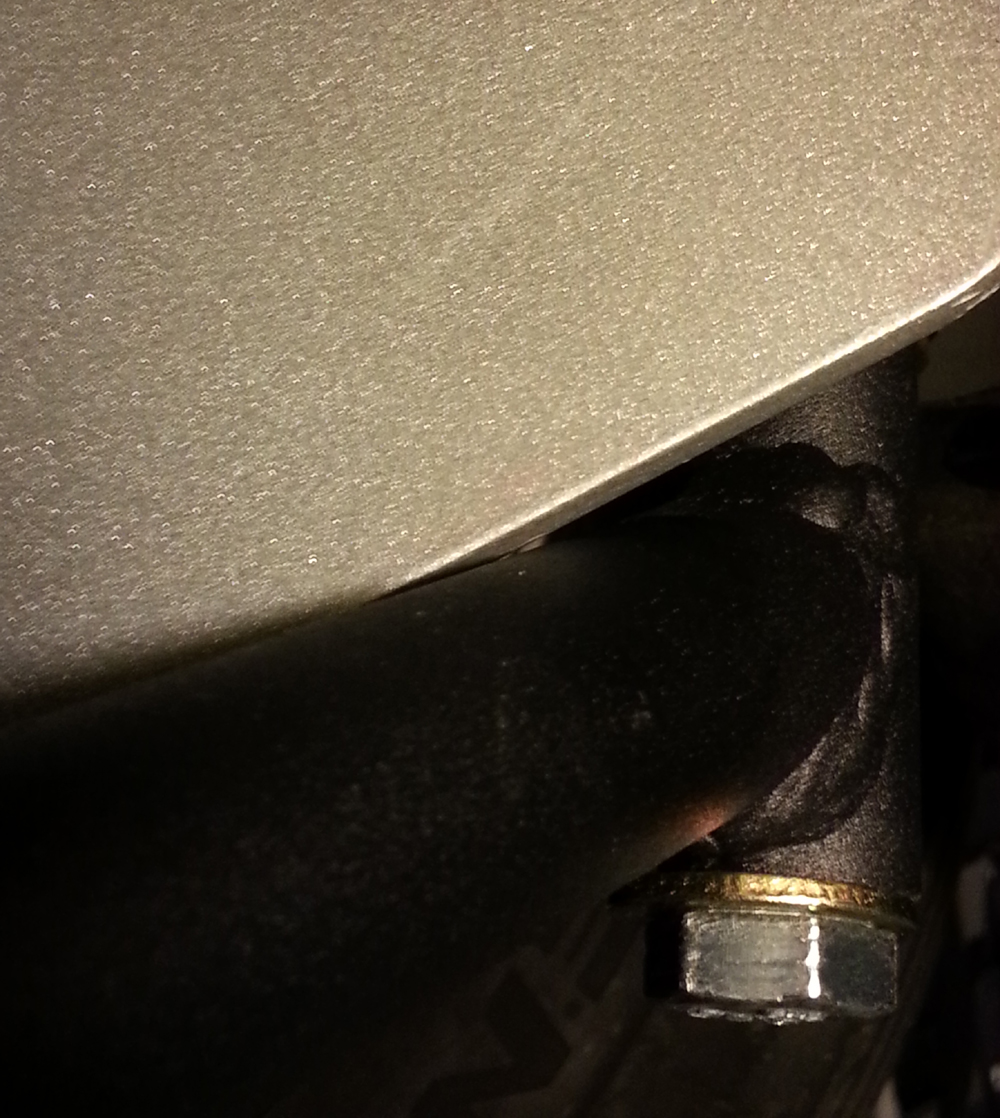
Just for informational purposes, I will point one slight glitch that I encountered, but was easily able to overcome: the clearance of the rear support tube adjacent to the K-member mounting flange was tight. In the picture above left, you can see how that tube ran under the flange up to the mounting bolt. Per the MM instructions, there is a single washer stacked above and below the mounting boss. In that configuration, the tube contacted the K-member, but with one additional washer stacked on top of all four bosses, it fit just fine. The picture on the right shows how close it is now, and if I was real picky, nipping away at that edge of the flange with a file or grinder would easily open up the gap. For now, it's no problem, the brace is doing its thing just fine, and I'm real happy taking the curves!
Note: An inconvenience arises that involves the Canton oil pan (details on my Engine page): the bottom edge of the sump where the drain plug is located is very close to the forward tube. Although the original Cobra R oil pan had the drain plug off to the side, it has been centrally located in the newer version. When it comes time to changing the oil, I'll end up having to remove the brace so the drain plug can be completely removed. It's not a big deal since it is a once-a-year project, but it sure beats splashing oil all over the place (or, a Form-A-Funnel is in my future!). Had I been using the MM K-member, I know they supply a specific 2-point brace that goes with the larger pan, but since the Steeda dimensions mirror those of Ford, I think the interchangeability of parts between the two companies still panned out real well despite this small glitch!
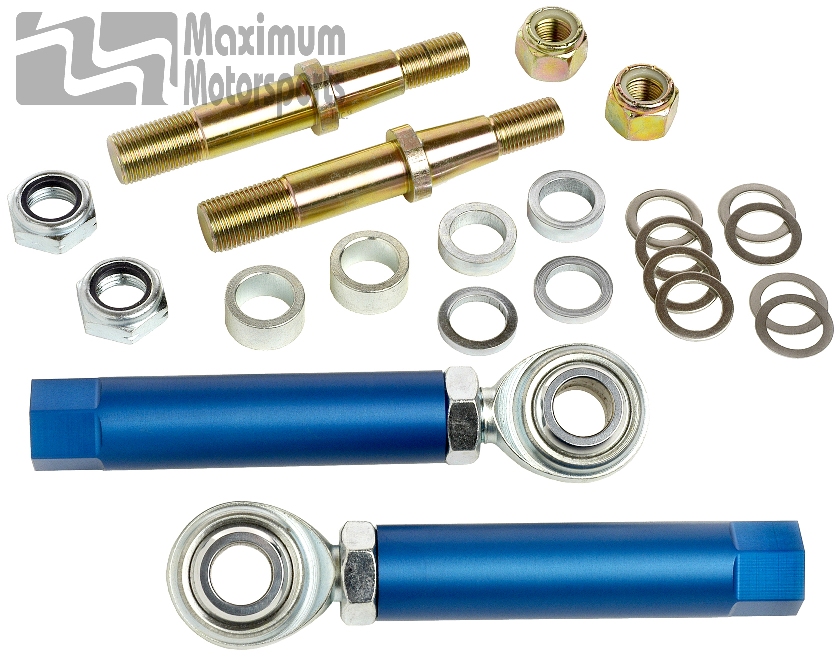
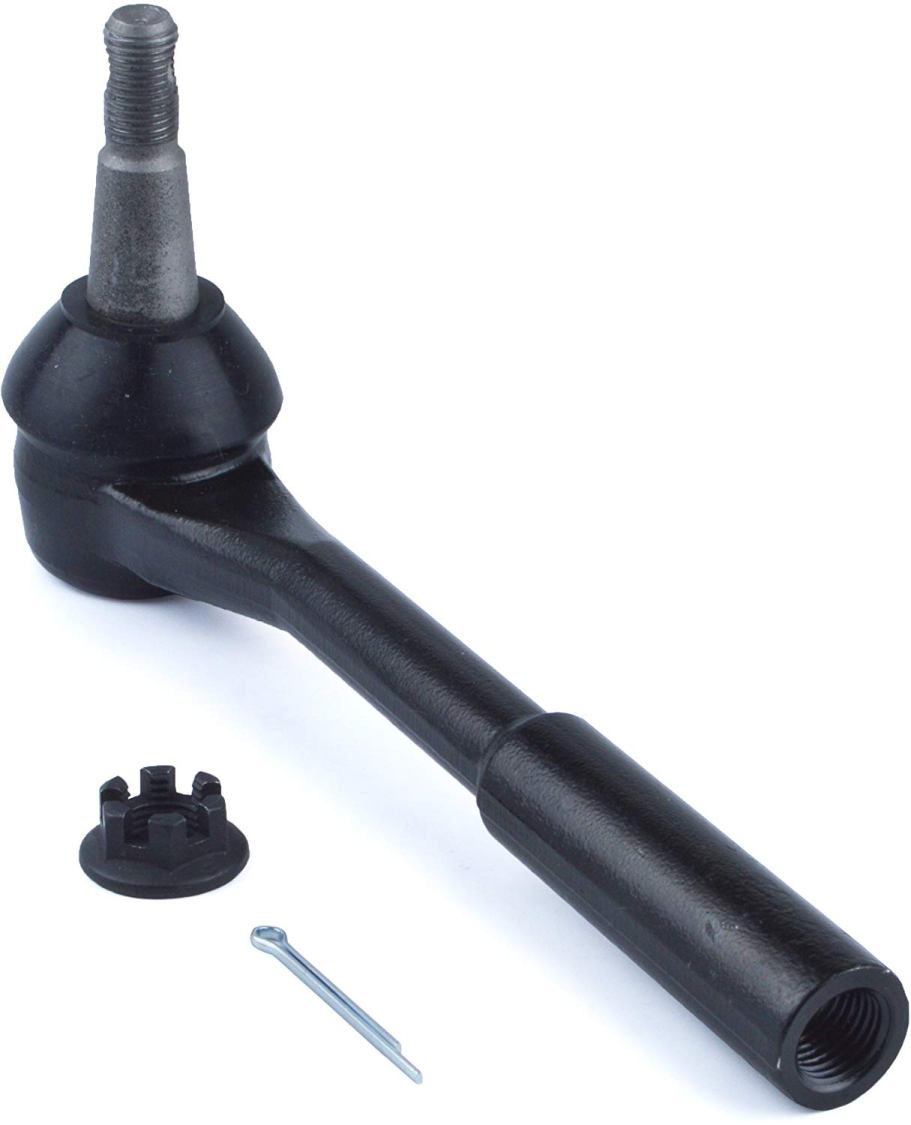
With all the upgrades to the suspension and steering, I wanted to make sure I was realizing the full potential by also adding stronger (and adjustable) tie-rod ends and trailing links. I had acquired the Maximum Motorsports MMTR-4 front, and MMIRSTR-2 rear kits, with the intention of really tightening things up - and they work well! Both are incredibly stout - using sealed heim joints and thick aluminum stock - and are a definite step up from the factory components.
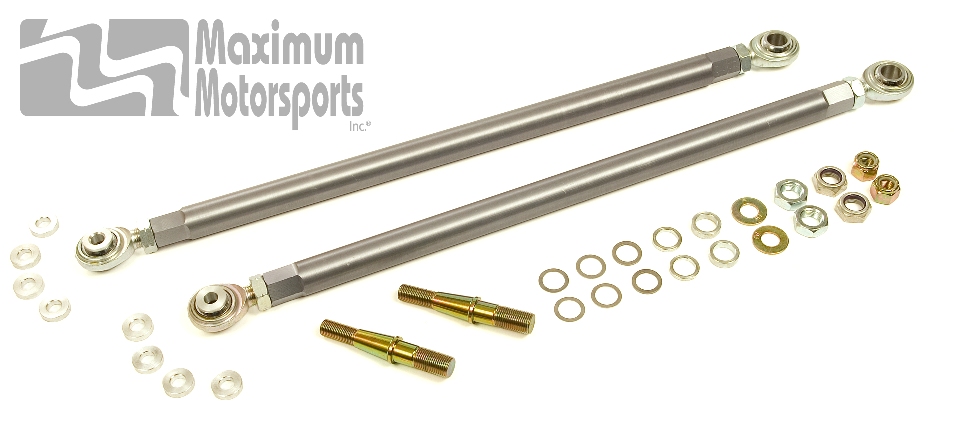
Once again, Maximum Motorsports did a great job with these and provide thorough instructions for both front and rear on their site, along with plenty of tech. Any of the imprecise feeling that arises from the OEM parts is gone. More importantly, you now have the ability to really fine-tune your steering, which is addressed in the section below.
Note: The OEM IRS trailing link that was once available as Ford p/n XR3Z-5K848-BA is another item that has gone extinct. If you are in need of replacing them, it only makes sense to upgrade, especially since the factory link is a bit flimsy. In the event the complete links are deemed not necessary for whatever reason, you can buy upgraded partial kits through Maximum Motorsports, and Kenny Brown. Additionally, an outfit called Proforged also makes replacement outer ends as their 104-10965 if your inner bar is still fine (the front outer ends are easy to find through many aftermarket sources).
 If you are serious about having your
steering (and handling) as precise as possible, you just can't overlook a good
alignment and bump-steer adjustment. The alignment is fairly straightforward,
but measuring bump-steer is something most shops will not do, so you are on your
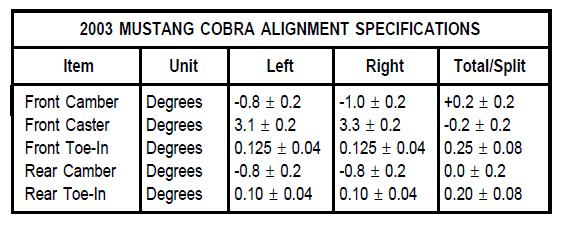
own. The OEM alignment specs from
TSB 03-03-06 (also shown in the thumbnail), are a good starting point and can be tweaked depending on your own
preferences before you take the next step. I decided to go with specs that
were once part of the Kenny Brown Sport spring kit (although with about -1.0°
camber up front) and they
have worked out quite well. Those specs are shown in the chart below.
If you are serious about having your
steering (and handling) as precise as possible, you just can't overlook a good
alignment and bump-steer adjustment. The alignment is fairly straightforward,
but measuring bump-steer is something most shops will not do, so you are on your
own. The OEM alignment specs from
TSB 03-03-06 (also shown in the thumbnail), are a good starting point and can be tweaked depending on your own
preferences before you take the next step. I decided to go with specs that
were once part of the Kenny Brown Sport spring kit (although with about -1.0°
camber up front) and they
have worked out quite well. Those specs are shown in the chart below.
|
Setting |
Front |
Rear |
| Toe: |
1/16" OUT (-0.25 to -0.30°) |
1/16" IN (+0.25 to +0.30°) |
| Camber (Street): | -0.50 to -0.70° | -1.20° |
| Camber (Aggressive street/track): | -0.70 to -0.90° | 0.00 to -0.60° |
| Caster: | "Max" (approximately 4.50°) | N/A |
As previously mentioned, I mounted the steering rack "forward" on the new K-member to mimic the factory Ackermann settings. Notice in the specs that the front toe is slightly negative, or out: this is essentially a way to cheat and help with the turn-in - similar to an increase in Ackermann. As far as I was concerned it was perfect before, so I didn't feel the need to alter it by moving the rack rearward. There is already a noticeable ease now when rolling in to a turn, and that is exactly what I wanted. I may tweak it in the future, but at the moment, I am happy with it as-is.
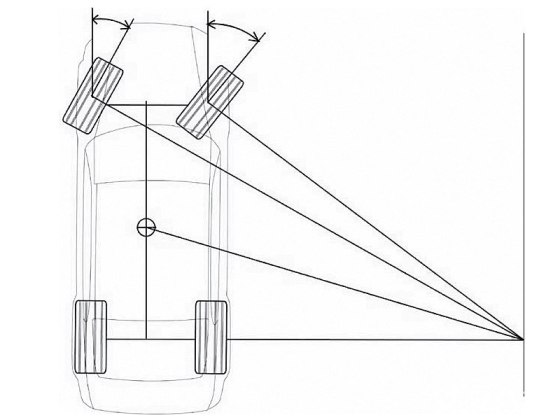
Once the alignment was tackled, it was time to address the "bump-steer", which is the change in toe that occurs as the suspension moves up or down. This toe change happens when the arc that the spindle travels on is different than the arc of the tie rod, and worsens when the vehicle is lowered thanks to the changes in the geometry of the control arms. When the toe changes even slightly without driver input, the wheels essentially steer themselves - definitely not preferred. There is plenty of information out there on the internet, but one article that does a nice job of explaining it comes from Hot Rod, so feel free to check it out.
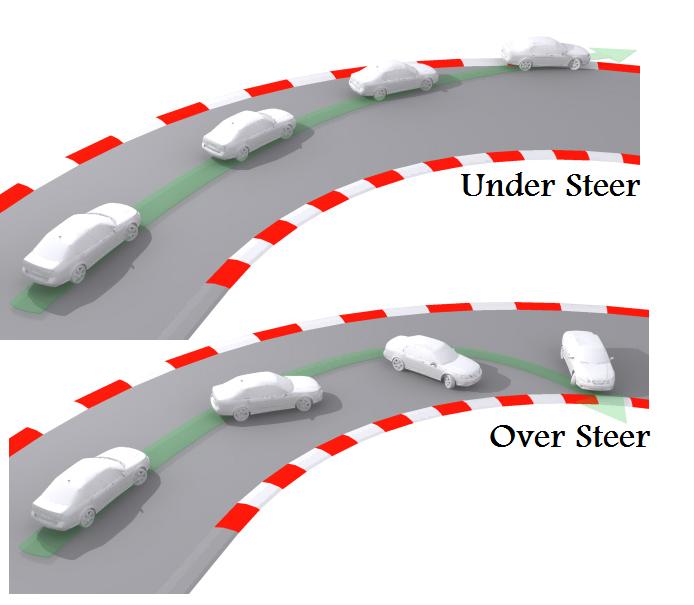 From
the factory, Ford builds in under-steer and designed the suspension so that
during bump, or compression, the front will actually toe out and the rear
will toe in (it is the opposite under droop, or extension). That is
perfect to keep the average driver from spinning out, but it is not always
optimal for any "performance" driving. To improve on this, you need to not only
measure the bump-steer, but correct and minimize it. This is especially
important for the IRS since it has a detrimental impact on steering as the rear
toe changes.
From
the factory, Ford builds in under-steer and designed the suspension so that
during bump, or compression, the front will actually toe out and the rear
will toe in (it is the opposite under droop, or extension). That is
perfect to keep the average driver from spinning out, but it is not always
optimal for any "performance" driving. To improve on this, you need to not only
measure the bump-steer, but correct and minimize it. This is especially
important for the IRS since it has a detrimental impact on steering as the rear
toe changes.
Fortunately, the addition of the adjustable outer rods ends allows you to change their height in order to re-adjust the geometry of the steering arm arcs. The instructions from Maximum Motorsports makes the process incredibly easy, but in order to do the job, you need the right equipment (and of course, the right parts). I'm fortunate to own a very nice bump-steer "gauge" that is made by Longacre Racing, but to do this a bit more economically, MM makes a Mustang-specific version that works great.
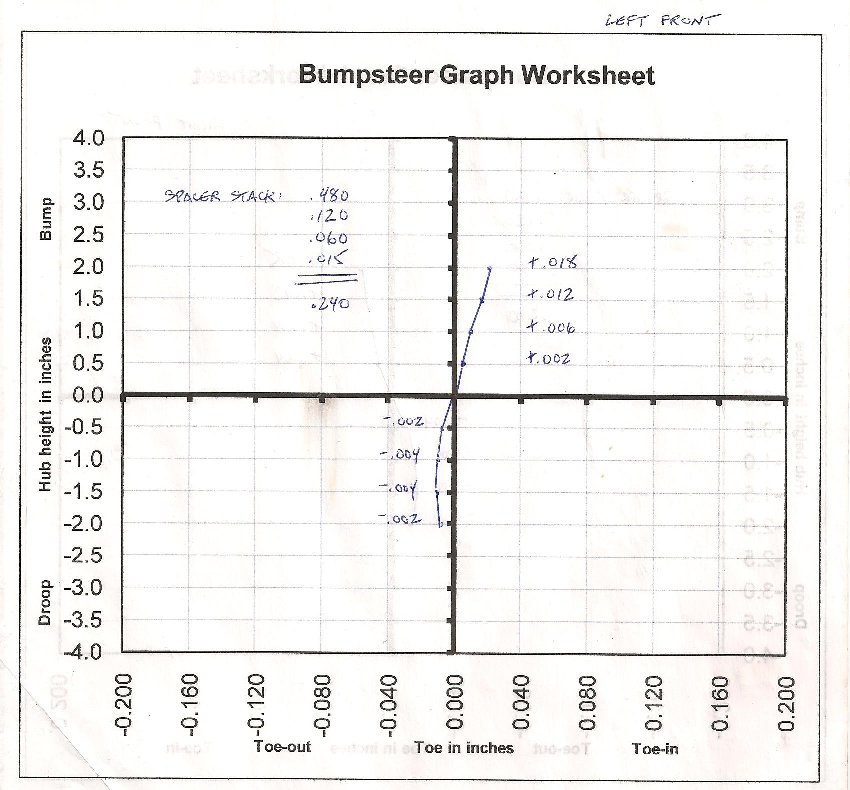
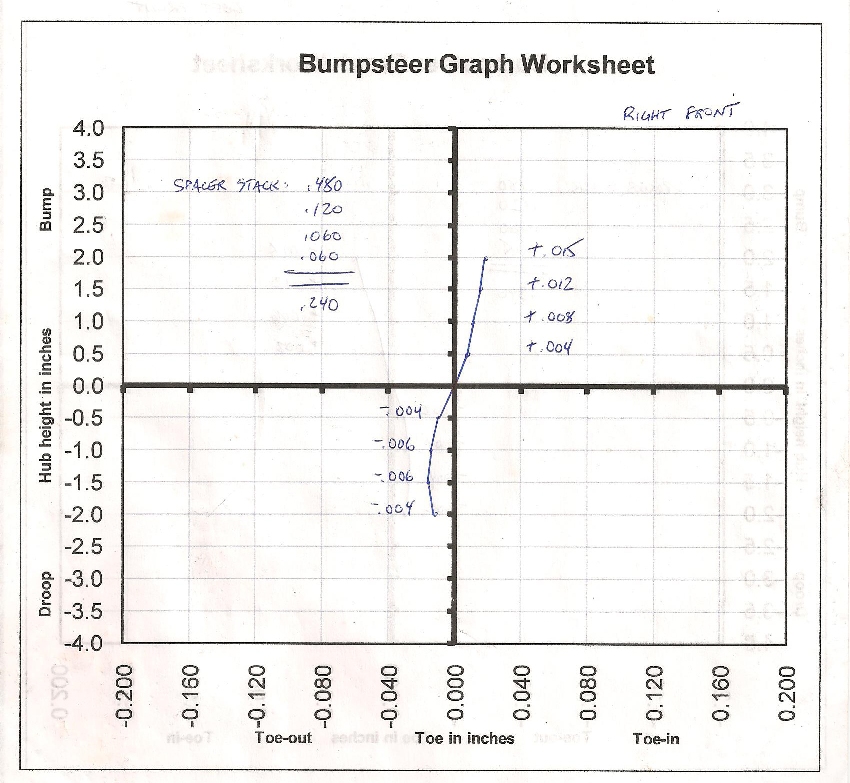
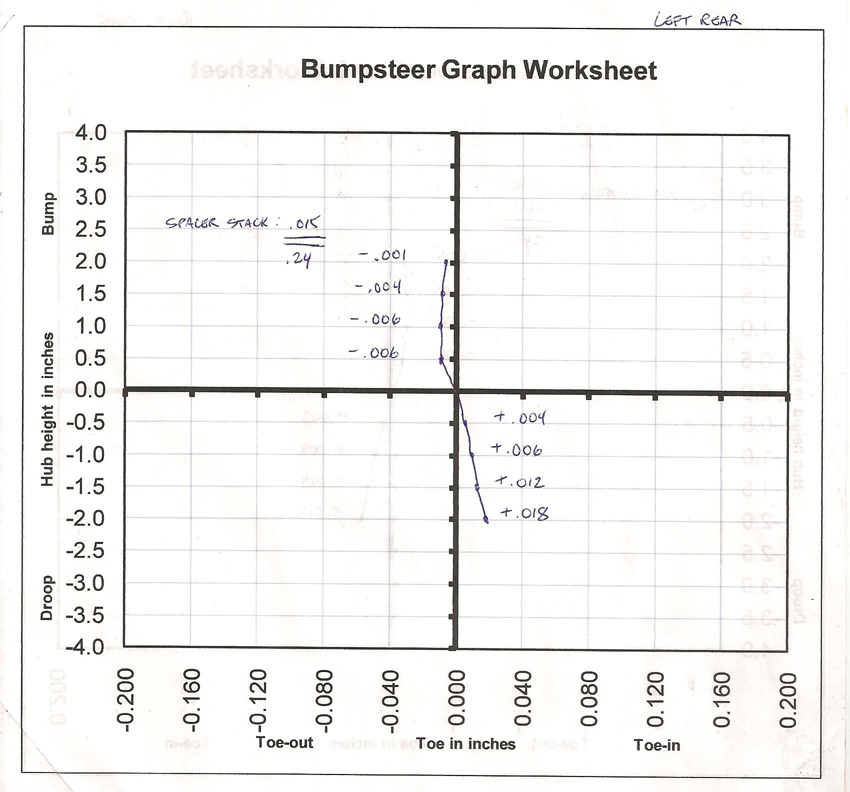
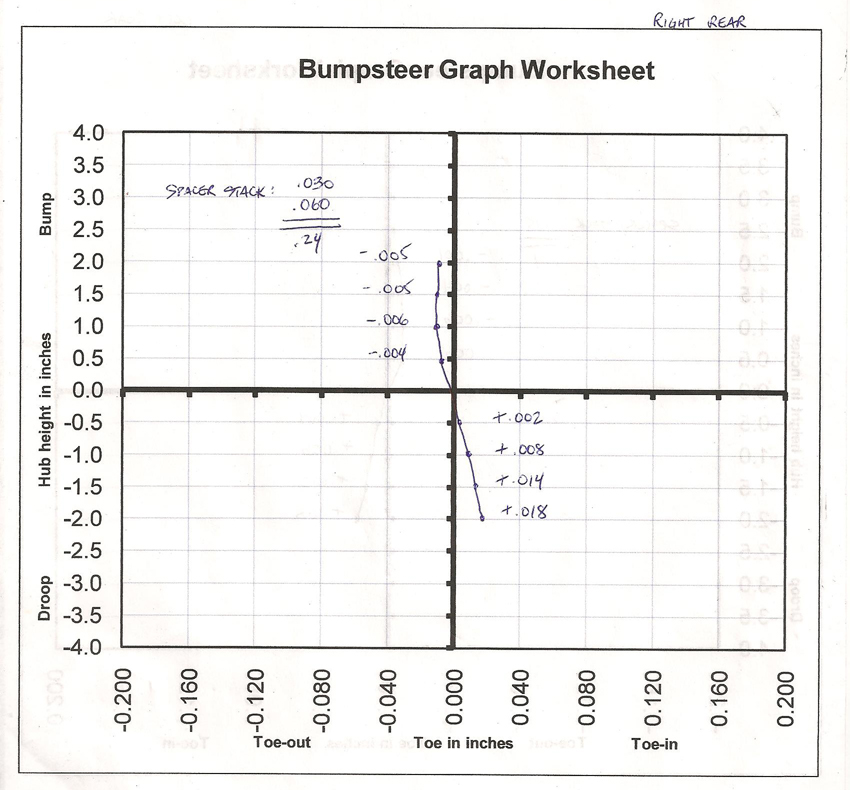
I won't get in to all the details on how to accomplish this since that's been done many times already (also, see my Suspension page for more on the roll center!). As an example of how it can turn out, the graphs I plotted after I finished my project are shown below. The adjustments to the factory curves that optimize the handling are obviously going to be opposite from the Ford settings, so keep that in mind. The front now has a slight toe-in under bump and the rear is the opposite of that - perfectly evident on the graphs.
Once you've dealt with the bump-steer process, it is a good idea to get yet another alignment. This is especially true since changes to the spacer stacks will change the toe, but fortunately, an adjustment to the toe (i.e., an alignment) will not then significantly effect the bump-steer. Some will say that an initial alignment is all that is needed, but for the most part, it is worth splurging to make sure every setting is right where you want it!
Note: MM recommends a toe change of less than 0.020" per inch of suspension travel, and I was fortunate to come in even less than that. This does take some trial and error, along with frequent changes to the spacer stacks to get it right where you want it, but it is not overly complicated. My spacers ultimately varied only 0.045" per side in the front, and 0.075" in the rear, and both stacks with the extra spacers also happened to be on the right side, which I would attribute to differences in production tolerances. Additionally, the graphs were only plotted from -2" to +2", but it is your prerogative if you want to expand on that.
For just about every Mustang owner out there, the addition of "subframe" connectors is right up near the top of the list - if not at the top - of must-do modifications and it was no different here. This is especially the case if you have a convertible with the useless bolt-on rails supplied by Ford. There are some nice offerings on the market, but like so many of my other parts, I looked to Maximum Motorsports. They make two versions, but I went big with their full-length "XL" rather than a "standard" set.
There isn't really much to tell except they do a fantastic job of stiffening up the chassis - no surprise. Being particular, I ordered mine bare and had them powder coated in a very light gray so they would blend in a bit more with the chassis. I haven't bothered getting any recent pictures, but had these two from way back after the install - they still look just as good today. For more on the benefits of chassis stiffening, MM also has a tech page loaded with information.

There are varying versions of these on the market in full-length and shortened configurations, along with those that add additional triangular braces and "jacking rails", so pick your poison. I've heard good comments about all of them, so it comes down to any number of factors that suit your needs. I've been happy with these and don't have one bad thing to say about them. No matter what though, if you have plans to really drive your Mustang, you just can't do it without a reinforced chassis!
Note: Had I really been thinking, I would have left them bare so the installer wouldn't have needed to bother grinding the coating away where he was going to weld. Like the steering shaft, they probably would have looked great if I let them flash rust, then painted them with a coat or two of the POR-15 silver. Even after all these years of tinkering, something obvious manages to slip by me once and a while!